1.You have a working/healthy cluster that you can access via System Manager and SSH.
2. You have a fully functional Windows domain with no DNS or other network infrastructure problems.
3. Be able to login to the domain from a workstation as a domain admin AND a domain user (non domain admin)
4. A test user account to login with to verify CIFS functionality.
5. A *nix box that you can mount NFS exports with.
So let's start with a NAS SVM that will serve up CIFS shares and NFS exports. You can create an SVM via System Manager or the CLI. I'll demonstrate both in this post.
Step 1. Create the new NAS SVM through System Manager.
We'll login to the cluster via System Manager and in the left pane expand "Storage Virtual Machines".
Then select the cluster, and click create in the right pane.
This brings up the Storage Virtual Machine Setup wizard/dialog.

Enter a name for the new NAS vserver.
I'm using FlexVol volumes for now. We'll explore infinite volumes later.
Check the boxes next to the protocols you want on this SVM. In this case I'm choosing both NFS and CIFS. (Don't worry we'll do some iSCSI later).
I leave the Language as the default - C.UTF-8
Security Style, I'm leaving as NTFS in this example.
Provide a root aggregate.
Enter DNS search domain and name servers. Mine looks like this:

Click "Submit & Continue".
So now we need to provide network configuration information for the data LIFS. We have the option of using one LIF for CIFS and NFS or we can uncheck the "Retain the CIFS data LIFs configuration for NFS clients." box to provide configuration information of a seperate LIF for NFS. In this example we will just use the same LIF. Though in production I'm sure many use-cases would dictate segmenting this traffic across different LIFs and physical ports.
We also need to provide CIFS server configuration details. Name the CIFS server, provide the FQDN of the domain you're joining, which OU you want the CIFS server to belong in and username/password of a user who can join computers to the domain. Mine looks like this:

Click "Submit & Continue"
You have the option to provide SVM administration configuration details. We'll explore this feature later. For now I'm going to hit "skip" in the bottom left.
You should now see a "New Storage Virtual Machine" (SVM) Summary" window showing your CIFS server was created successfully and NFS service has been started as well as other details:

Now that we have an SVM created, lets provision some CIFS shares and verify user access.
Step 2. Lets provision a volume for CIFS
In the left pane "Storage Virtual Machines" should already be expanded. Expand the cluster, then expand the new SVM. Then expand "Storage" and click on "volumes".
Click "Create"
The "Create Volume" dialog appears.
Provide a name (meaningful names are very helpful)
Choose an aggregate to host the volume.
Click "OK"
Leave "Storage Type" set to NAS (I don't think there's any other option since we didn't enable iSCSI protocol on this SVM).
Enter the desired size.
Enter the desired snapshot reserve.
Select "Thin Provisioned" if desired. In my labs I almost ALWAYS thin provision as it saves me a lot of space.
We'll go over Storage Efficiency and QOS at a later time.
Click "Create"

Step 3. Create shares.
In the left pane of System Manager "Storage Virtual Machines" should be expanded, as well as the nas SVM, and "storage"
Click "Namespace"
Notice the volume we created for CIFS is automatically mounted under "/"

Click on "Shares" in the left pane
Click "Create Share"
The "Create Share" dialog appears.
Click "Browse" to choose the volume we created in step 2. Or type the path in the "Folder To Share" field.
Provide a share name.
Provide a comment (optional)
If the share were hosting Hyper-V VHDs over SMB we would check the box to enable continuous availability for Hyper-v and/or SQL.
Click "Create"

Step 4. Set some permissions.
In this example we will make the share read-only to domain users, and read/write to administrators.
Under our NAS SVM in the left pane of System Manager, click "shares"
Highlight the CIFS share and click "edit"
The "Edit cifs Settings" dialog appears
Click the "Permissions" tab
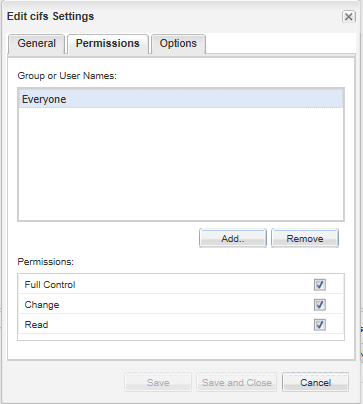
You can see "Everyone" has full control. Technically they need this if the desire is for them to be able to write to any other shares below /cifs_vol1 which we created above. But in this example we are going to restrict this share so domain users can only read the share and only domain admins can read/write.
So uncheck "Full Control" under "Permissions"
Uncheck "Change"
Click the "Add.." Button so we can add admins and give them full control.
Type \Domain Admins where "" is your domain.
Check "Full Control"
Click "Save and Close"

Step 5. Verify access.
Let's verify Domain Administrators can access the CIFS share and have read/write access.
Login to a workstation that is a member of the domain as a member of the domain admins group.
Open Windows Explorer
In the address bar, browse to the share. In my example it is: \\nas1\cifs
Create a new folder.

Open the new folder and create a new text document.
Now login to a workstation that is a member of the domain as a generic domain user, who is NOT a member of the domain admins group.
Open Windows Explorer
In the address bar, browse to the share.
Note you can read the share and see the new folder.
Open the new folder.
And note we can see the new text document we created.
Try and delete the existing text document. Or try creating a new document.
You should see the following error from Windows:

We have successfully created a CIFS share and laid down some basic permission settings on it and verified the access is working as we intended. This basic demonstration of CIFS configuration is complete.
Now let's try NFS. Bear with me, I'm a Windows guy by default and have only been playing with Linux for a few years, and in a very limited/noobish kind of way at that. I find that things I can do in Windows in a few minutes, may take hours (worst case, days) in Linux. But I'm getting better all the time.
Step 6. Create an NFS export on the NAS SVM
We already provisioned a volume in step 2, so let's rinse and repeat.
The only additional step is after creating the volume, select it.
Click "edit"
Change the drop down for "Security style" to UNIX
Click "Save and Close"

Step 7. Mount the NFS export
Login to the linux box and attempt to mount the newly created volume.
I got this:
miami@miamioffice:/mnt$ sudo mount -t nfs nas1:nfs_vol1 /mnt/nfs
mount.nfs: access denied by server while mounting nas1:nfs_vol1
DOH!
When we create a volume it is automatically mounted in the namespace. as we demonstrated above. However, it inherits the namespace export policy. To resolve this, in System Manager expand "policies" and click on "export policies".
Highlight the default policy.
Click "Add Rule"
The "Create Export Rule" dialog appears.
In the "Client Specification" field enter 0.0.0.0/0 NOTE: This means any client on any subnet gets access via the protocols we define below with the permissions defined further below.
Check the box for "CIFS"
Check the box for "NFS"
Mine looks like this:

Click "OK"
Now try mounting the export from the Linux box again:
miami@miamioffice:/mnt$ sudo mount -t nfs nas1:nfs_vol1 /mnt/nfs
miami@miamioffice:/mnt$
Success! Although, this export policy rule is set wide-open...in many environments this is probably not desirable, but in my lab it's fine. We'll demonstrate more restrictive policies later.
Now I'll blow this SVM away and create the same/similar configuration from the command line.
Step 8. Create same SVM from command line.
There are many shorter commands to complete the same thing which I will demonstrate later, but the easiest is the "vserver setup" command.
miamicl::> vserver setup
Welcome to the Vserver Setup Wizard, which will lead you through
the steps to create a virtual storage server that serves data to clients.
You can enter the following commands at any time:
"help" or "?" if you want to have a question clarified,
"back" if you want to change your answers to previous questions, and
"exit" if you want to quit the Vserver Setup Wizard. Any changes
you made before typing "exit" will be applied.
You can restart the Vserver Setup Wizard by typing "vserver setup". To accept a default
or omit a question, do not enter a value.
Vserver Setup wizard creates and configures only data Vservers.
If you want to create a Vserver with Infinite Volume use the vserver create comm
Step 1. Create a Vserver.
You can type "back", "exit", or "help" at any question.
Enter the Vserver name: nas1
Choose the Vserver data protocols to be configured {nfs, cifs, fcp, iscsi, ndmp}
Choose the Vserver client services to be configured {ldap, nis, dns}: ldap,dns
Enter the Vserver's root volume aggregate [aggr1]:
Enter the Vserver language setting, or "help" to see all languages [C.UTF-8]:
Enter the Vserver root volume's security style {mixed, ntfs, unix} [unix]: ntfs
Vserver creation might take some time to finish....
Vserver nas1 with language set to C.UTF-8 created. The permitted protocols are
Step 2: Create a data volume
You can type "back", "exit", or "help" at any question.
Do you want to create a data volume? {yes, no} [yes]:
Enter the volume name [vol1]: cifs
Enter the name of the aggregate to contain this volume [aggr1]:
Enter the volume size: 1g
Enter the volume junction path [/vol/cifs]:
It can take up to a minute to create a volume...
Volume cifs of size 1GB created on aggregate aggr1 successfully.
Do you want to create an additional data volume? {yes, no} [no]:
Step 3: Create a logical interface.
You can type "back", "exit", or "help" at any question.
Do you want to create a logical interface? {yes, no} [yes]:
Enter the LIF name [lif1]: nas1_data
Which protocols can use this interface {nfs, cifs, iscsi}: nfs,cifs
Enter the home node [miamicl-01]:
Enter the home port {e0a, e0b, e0c, e0d} [e0a]: e0c
Enter the IP address: 192.168.1.15
Enter the network mask: 255.255.255.0
Enter the default gateway IP address: 192.168.1.1
LIF nas1_data on node miamicl-01, on port e0c with IP address 192.168.1.15 was created.
Do you want to create an additional LIF now? {yes, no} [no]:
Step 4: Configure DNS (Domain Name Service).
You can type "back", "exit", or "help" at any question.
Do you want to configure DNS? {yes, no} [yes]:
Enter the comma separated DNS domain names: tuna.corp
Enter the comma separated DNS server IP addresses: 192.168.1.11
DNS for Vserver nas1 is configured.
Step 5: Configure LDAP (Lightweight Directory Access Protocol).
You can type "back", "exit", or "help" at any question.
Do you want to configure LDAP? {yes, no} [yes]:
Enter LDAP Server IP address: 192.168.1.11
Enter LDAP Server port number [389]:
Enter LDAP Server Minimum Bind Authentication Level {anonymous, simple, sasl} [anonymous]:
Enter Bind DN (User) [none]:
Enter Base DN []:
LDAP for Vserver nas1 is configured.
Warning: The aggr-list for Vserver "nas1" is empty. Once aggr-list is configured, -max-volumes will be enforced.
Step 6: Configure NFS.
You can type "back", "exit", or "help" at any question.
NFS configuration for Vserver nas1 created successfully.
Step 7: Configure CIFS.
You can type "back", "exit", or "help" at any question.
Do you want to configure CIFS? {yes, no} [yes]:
Enter the CIFS server name [NAS1-MIAMICL]: nas1
Enter the Active Directory domain name: tuna.corp
In order to create an Active Directory machine account for the CIFS server, you must supply the name and password of a Windows account with sufficient privileges to add computers to the
"CN=Computers" container within the "tuna.corp" domain.
Enter the user name: administrator
Enter the password:
CIFS server "NAS1" created and successfully joined the domain.
Do you want to share a data volume with CIFS clients? {yes, no} [yes]:
Enter the CIFS share name [cifs]:
Enter the CIFS share path [/vol/cifs]:
Select the initial level of access that the group "Everyone" has to the share {No_access, Read, Change, Full_Control} [No_access]:
The CIFS share "cifs" created successfully.
Default UNIX users and groups created successfully.
Vserver nas1, with protocol(s) nfs,cifs, and service(s) dns,ldap has been configured successfully.
miamicl::>
It's way faster to configure the nas1 server via the CLI. Granted there are a few more steps to make it exactly as the same as the one we made in System Manager the commands to do so are pretty easy if you remember these four words, "tab is your friend" in cluster mode.
1 comment:
Nice
Your demonstration regarding "mount.nfs: access denied by server while mounting ..." helped me with my issue. Yes, mine is now set wide open as far as security but at this stage I'll figure out locking it down later....
Thanks for this... Lance
Post a Comment